ESLint and Prettier are a great combination when it comes to doing JavaScript development work in Visual Studio Code. From this post, you can expect -
- Quick Introduction of ESLint
- Quick Introduction of Prettier
- Configure ESLint and Prettier in Visual Studio Code
- Example
Quick Introduction of ESLint
Writing JavaScript codes with clear coding conventions with automated enforcement is always the practice that every developer should follow. ESLint is that tool for linting Node.js packages, JavaScript files and can be easily configured to enforce many coding styles. Here is what mentioned in the ESLit website -
"ESLint is a static code analysis tool for identifying problematic patterns found in JavaScript code".
Website: https://eslint.org/
Quick Introduction of Prettier
Prettier is an opinionated code formatter. It is highly recommended when comes to making code formatted consistently for you and your team. Prettier supports many languages out of the box.
Website: https://prettier.io/
Configure ESLint and Prettier in Visual Studio Code
Step 1 - Install ESLint and Prettier from the VS Studio Marketplace
We can search for them in VS Studio Marketplace and Install from there.
Step 2 - Global Settings
I have enable Editor: Format On Save. We can open settings from Ctrl + p and then type > Preferences: Open User Settings. Once opened check the box as shown below -
 |
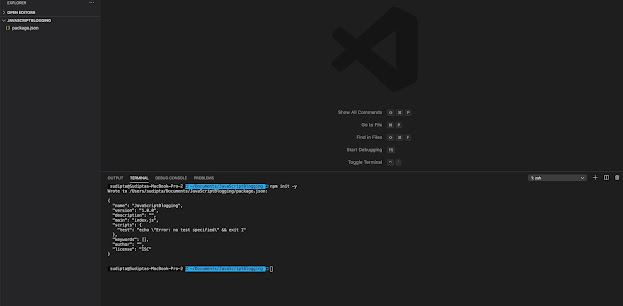
Step 3 - Initiate npm and create package.json
Execute the command "npm init -y" in the terminal and it will create package.json. Screenshot below
Step 4 - Install ESLint and Prettier as dev dependencies
Execute the command "npm i -D eslint prettier" and it will install the ESLint and Prettier as dev dependencies. Once installed, it will update package.json as -
Step 5 - Install ESLint-Plugin-Prettier and ESLint-Config-Prettier as dev dependencies
Installing this dependency will allow us to run prettier as eslint rules and report any issues. To install execute the command "npm i -D eslint-plugin-prettier eslint-config-prettier".
Step 6 - Install ESLint globally
We have to generate ESLint config files. Definitely we can generate the file manually, but I prefer generating the file through command. In order to generate ESLint config file through command line, we need to install ESLint globally. We can execute the command "sudo npm i -g eslint"
Step 7 - Generate the ESLint config file
We can execute the command "eslint --init" and then answer the questions asked there. This will create the config file named ".eslintrc.json".
Step 8 - Update ESLint configuration
All the ESLint configurations are listed here.
ESLint-plugin-prettier configurations are listed here.
This is what I recommend for ESLint config -
{
"env": {
"browser": true,
"node": true,
"es6": true
},
"extends": [
"eslint:recommended",
"plugin:prettier/recommended"
],
"plugins": ["prettier"],
"rules": {
"prettier/prettier": "error"
}
}
Step 9: Update scripts in package.json
We can write below two lines/scripts in package.json which will help us to run javascript files and also execute eslint.
"start": "node",
"lint": "eslint",
Here is the final package.json file
{
"name": "JavaScriptSetup",
"version": "1.0.0",
"description": "",
"main": "HelloWorld.js",
"scripts": {
"start": "node",
"lint": "eslint",
"test": "echo \"Error: no test specified\" && exit 1"
},
"keywords": [],
"author": "Sudipta Deb",
"license": "ISC",
"devDependencies": {
"@typescript-eslint/eslint-plugin": "^3.6.1",
"@typescript-eslint/parser": "^3.6.1",
"eslint": "^7.4.0",
"eslint-config-prettier": "^6.11.0",
"eslint-plugin-prettier": "^3.1.4",
"prettier": "^2.0.5"
}
}
Step 10: Execute JavaScript
Let's create HelloWorld.js under src folder with simple statement console.log("Hello World");
From the terminal, execute the below command to execute HelloWorld.js
Note - In the command, I have passed the file name "src/HelloWorld.js" but I have used -- twice in the command. The reason for that to make sure letting npm know that the parameters are not for npm, rather this parameter is for the node so that it understands which file to execute.
Step 11: Execute ESLint and fix errors if needed
Execute the below command "npm run lint -- -- src" which will execute eslint in all the files present src folder. If there is no error, it will just show nothing. In case of error, it will show something like this -
The reason for this error is that Hello World is mentioned with single quotes and ESLint is recommending double quotes. You can fix these problems by executing "npm run lint -- --fix src".
I have shared this initial project in my Github Repo - ESLint-Prettier-VSCode-Setup
Below is the youtube video:


0 Comments